
The Preferences Window
The preferences window give you the ability of affecting the behavior of File Synchronization.
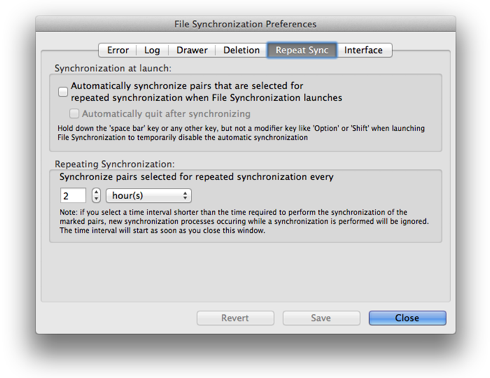
The Automatically synchronize pairs that are selected for repeated synchronization when File Synchronization launches checkbox does exactly what it says: when launching File Synchronization, the pairs that have been set for a repeating synchronization will be synchronized. If you want to temporarily disable the auto sync at launch, immediately after launching File Synchronization, press and hold the Spacebar key when the main window appears and hold it down for a few seconds. The Automatically quit after synchronizing will quit File Synchronization when the last pair selected for repeated synchronization has been synchronized. If there are any error encountered, the synchronization will stop and you will have to intervene to fix the problem.
The Repeating Synchronization section lets you set the time interval used to repeat the synchronization. You have a choice of minutes, hours or days. Note that if an automatic synchronization is due to start and there is already a synchronization in progress, the automatic synchronization will be canceled for that specific time and will be repeated after the time interval. If any error are detected, the automatic synchronization will stop, waiting for you to fix the error. The time interval will start when you click the Close button. Note that pair set for an automatic synchronization will not be automatically synchronized at launch. Only the pairs set for a repeated synchronization will.
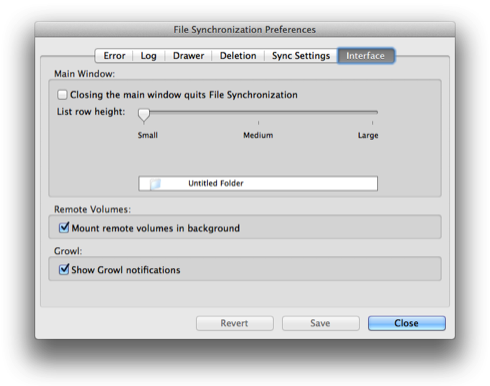
The Mount remote volumes in background will let you continue to use File Synchronization if you click on a pair of folders that has one of its folder located on a remote volume. If you turn this option off, then each time you click on a pair using a folder on a remote volume, File Synchronization will block waiting for the system to mount the volume. That means you won't be able to perform an operation and File Synchronization will be totally non-responsive. This can take from a few seconds up to a minute if your network is slow or if the remote volume is attached to a slow computer. NOTE: this option should be turned OFF if you're planning to do any type of automatic synchronization. If you don't turn this off, when File Synchronization performs an automatic synchronization, it will try to access the folder on the remote volume and will not wait for the remote volume to mount. This will generate an error that will stop your automatic synchronization.
Finally, Show Growl Notifications will turn on or off the Growl notifications. Note that even if you have Growl installed and set to display notifications from File Synchronization, you will have to turn it on here to see them in Growl.
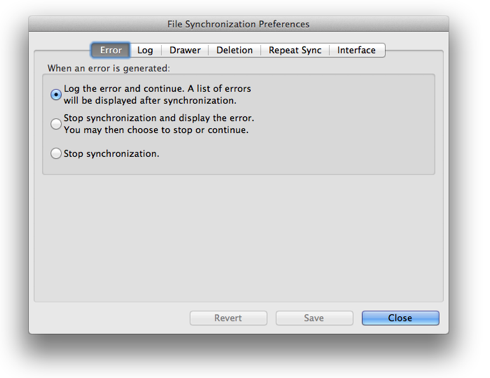
At the bottom of the window and always present are 3 buttons that will change their appearance depending on your actions. Initially, only the Close button will be enabled and the default button. If you make any change to any preference, the Revert and Save buttons will be enabled, with the Save button becoming the default button. Note that any change you make won't be active unless you save those changes and then close the preferences window. For example, the time interval for the repeated synchronization won't start until the window is closed.